Microsoft Word DOCX – export config usage
This document explains options for configuring PageSeeder to create a .docx file from PSML source documents. It is a companion to the Microsoft Word DOCX – import config.
A copy of the default word-export-config.xml is available for reference, see the default config example.
Additional information regarding DOCX support in PageSeeder is:
- Word DOCX – export schema reference (under development), and
- Export Microsoft Word DOCX Ant task.
Overview
Exporting PSML data to the .docx file format requires the Microsoft Word Export Config (word-export-config.xml), and the Word Export Template (word-export-template.dotx).
Using .docx as a target format for PageSeeder publications means that the styles in existing Word documents can provide the page layout settings for PSML labels and structures. Mapping that information from PageSeeder into Word is the purpose of the word-export-config.xml, and this document.
Usage
A standalone PSML document can be exported, or a publication consisting of more than one PSML document can be exported.
There are two ways to customize a word-export-config.xml. Both require that a user is either an administrator on the server, or a manager on the project. Providing the member meets one of these, they can use this method to modify the config for their own use ONLY:
- Sign in to PageSeeder, and select a project or group.
- Select Developer under Account menu > Preferences, Layout preference.
- Project managers and administrators can change the
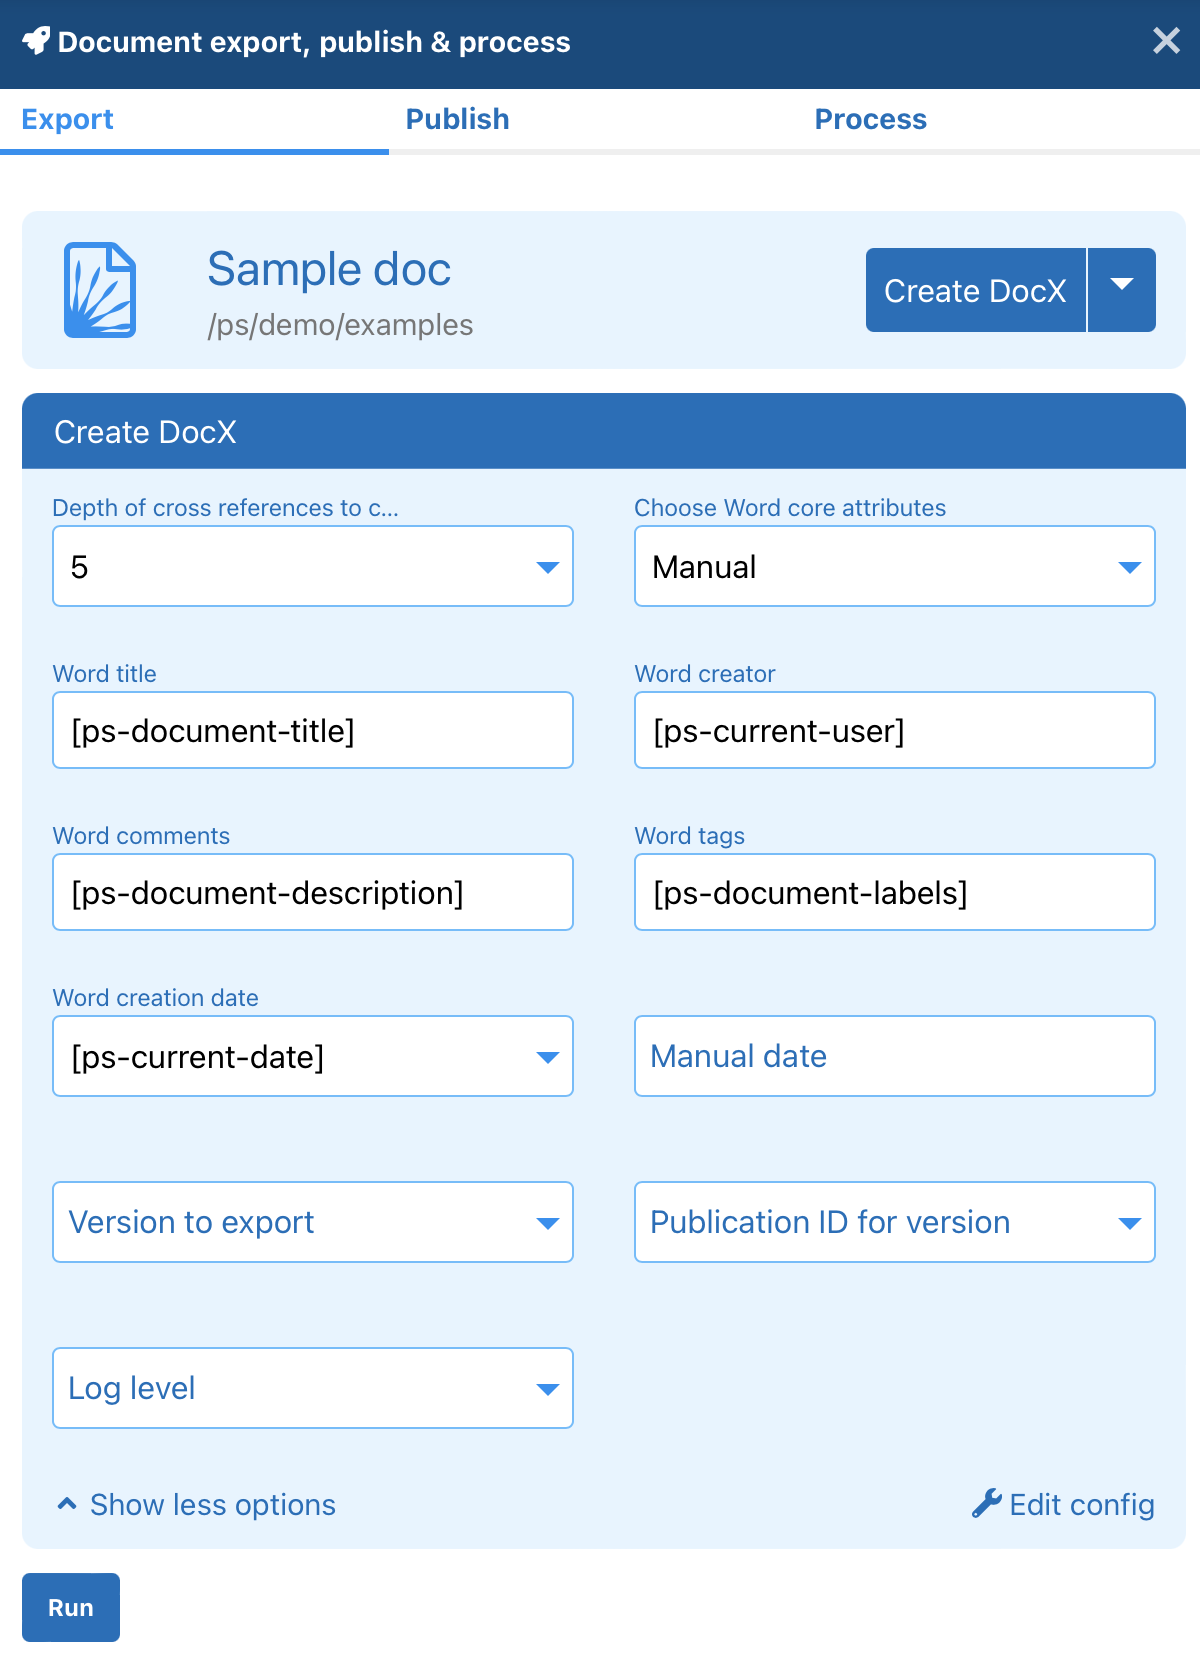
word-export-config.xmlfor themselves ONLY, go to a document, click the rocket icon in the right sidebar (or from Documents page, under the ellipsis to the right of a document), then under the Export tab, select to export as PDF or DOCX, click Show more options, and then click theEdit config option. - The Member publish configurations page only has one row and applies to all document types.
Alternatively, the member can change the configuration for all group members:
- Click Project administration menu > Template > Template configuration, note the options under the Publication types table in the Word export column.
-
To change the configuration for all documents (that are not a custom type), select override under the default option in the default row.
-
To revert to the default
word-export-config.xml, select delete under the edit option in the default row. -
OR, to change the configuration for a custom type, click create under Word export column in the row for that type.
To autocomplete the word-export-config.xml file contents, press ctrl-space when editing.
Word export template file
By design, there is no formatting information in PageSeeder content. This is not because formatting isn’t important, rather, it is to support the concept of separating content and format. The architectural objective for this is that the exclusion of formatting leads to:
- better reuse of content
- better productivity for writers
- more flexibility of delivery formats.
Moving formatting further along the document lifecycle, and adding it programmatically instead of manually, improves quality and consistency.
Using Word to get the most out of PageSeeder requires first creating a Word document as a template, with the appropriate styles, margins, page size and so on. Next, this file must be available to the export process, so upload it to the project. Finally, map the PSML content and labels to the styles in the Word document, using the following relationships:
- Characters – equivalent to an inline label.
- Paragraphs – equivalent to a block label, <para> or <heading>.
- Tables – can be categorized in PageSeeder by the use of the @role attribute.
- Lists – can be categorized in PageSeeder by the use of the
@roleattribute on <list> or <nlist>. - Images – can have a character style.
- Metadata – map pre-defined properties.
- Fields – including footnotes, endnotes, index entries.
- References – including Xrefs and links.
The location of the default export template for a project is:
WEB-INF/config/template/[project-name]/publication/default/
    word-export-template.docx
Page breaks are inserted by selecting Page break before, usually on a heading or paragraph style in Word. For ad hoc page breaks a block label containing a space must be mapped to this word style.
Word export template file – Numbering
It is recommended to start with the default word-export-template.docx for your publication type, rather than mapping the PSML to your document, as it contains the mappings for Word styles and multi-level list styles to provide correct numbering on output. It is not recommended to use the same .docx you imported as an export template, as some things might not work – modifying the default export template is recommended.
For this, first download the default export template from your project on PageSeeder – click the
- In the main section, under Template, click CONFIG.
- Or, in the Project administration menu > Template > Template configuration.
Then, in the Publication types table, Template column and in the default row, click default.
Modify the styles in Word and save the changes. Then, as outlined above, in the Template column, click upload in the default row (or a custom publication type row).
Heading and paragraph numbering in Word is famously opaque, but if it’s correctly setup, it will work. However, Word has limitations such as numbered paragraphs must be under the lowest level of numbered headings in your document. For example if headings 1-3 are numbered then numbered paragraphs must always be under heading 3. Keep this in mind when creating content.
To get the right results from the PageSeeder export, the word-export-config.xml and the word-export-template.docx must have the proper configuration of bullet and numbered list paragraph styles.
Users unfamiliar with Word multilevel lists, or List Styles will find it easier to modify the existing word-export-template.docx, than to configure new lists.
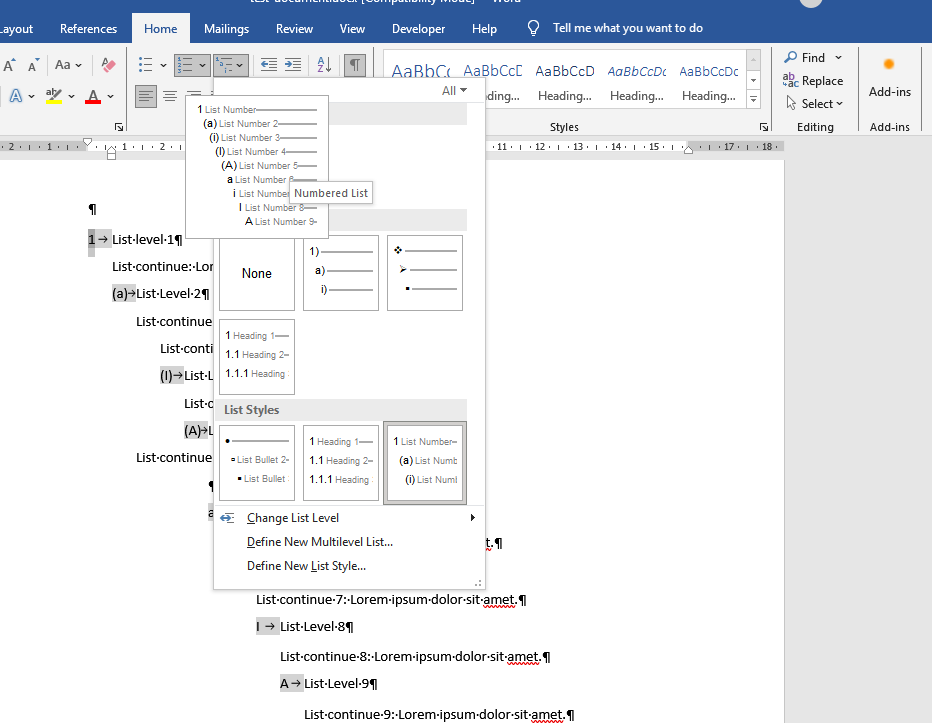
However, for those that want to start fresh, the ways to create a new List Style are:
- Create a paragraph style for each level in the list, for example
MyList1,MyList2. - Select Define New List Style from the Multilevel List menu (NOT Define New Multilevel List).
- Enter a name for the List Style, for example
My List(which you will use in theword-export-config.xml), then select Numbering from the Format menu and define the numbering options for each level. - Click More and link the correct paragraph style to each level.
- Alternatively, map PSML paragraph levels onto the default paragraph styles in the
Normal.dotxtemplate, for example,List Number,List Number 2etc.
For more detailed information about the relationship between PageSeeder and numbering in Word, see the Word Import Config – Usage document, under Word import – Numbering.
Word export config file
The location of the default word-export-config.xml for a project is:
WEB-INF/config/template/[project-name]/publication/default/
    word-export-config.xml
The information below describes different ways that the word-export-config.xml file transforms PSML into .docx format.
- In Word, styles can have multiple names, separated by commas. For the export, use only the name before the first comma. For example, reference this style
My heading,Specialas follows:<level value="1" wordstyle="My heading" > - Only refer to Word styles in the template. An example is where a
@wordstyleis misspelled, it won’t export as expected. - The heading styles built-in to Word are special – refer to them using lower case, for example
wordstyle="heading 1". - Sometimes Word style names display as upper case but are actually lower case, if a style does not apply, try changing the reference to lower case.
<core>
In the word-export-config.xml, this element populates the Word document properties in the output Word file, from token values in the PageSeeder system and some from the PSML. To see the document properties of a .docx file, click the Info option under the File menu in Word.
<core>
  <creator select="[ps-current-user]" />
  <description select="[ps-document-description]" />
  <title select="[ps-document-title]" />
  <!-- <modified select="[ps-document-modified]" /> -->
  <created select="[ps-current-date]" />
  <keywordsselect="[ps-document-labels]" />
  <subject select="" />
  <category select="" />
  <version select="1.0" />
  <revision select="1" />
</core>
To export using these values, in the Document publish panel, click Show more options and select ‘Config’ in the Choose Word core attributes field drop-down. Or, set the manual-core parameter to Config. The export mapping uses the Word document properties fields above and the token values below.
| Token | PageSeeder content |
|---|---|
[ps-current-user] | The full name of the current user (requires current-user parameter on export task) |
[ps-document-description] | The PSML document description |
[ps-document-title] | The PSML document title |
[ps-document-created] | The PSML document created date |
[ps-document-modified] | The PSML document modified date |
[ps-current-date] | The current date |
[ps-document-labels] | The PSML document labels |
There are three options to source the values to export for the Word document properties. In the Choose Word core attributes field drop-down in the document publish panel:
- Values come from the document publish panel (default option) –
manual-corevalue="Manual". - Values under
<core>in theword-export-config.xmlare used –manual-corevalue="Config". - Values in the
word-export-template.xmlare used –manual-corevalue="Template".
Each of the word-export-config.xml elements below maps to a Word document property as follows:
<creator select="PageSeeder" />
<creator>maps to the Author property in Word.
<description select="PageSeeder" />
<description>maps to the Comment property in Word.
<subject select="PageSeeder Document" />
<subject>maps to the Subject property in Word.
<title select="Default Title" />
<title>maps to the Title property in Word.
<category select="No Category" />
<category>maps to the Category property in Word.
<version select="1.0" />
<version>maps to the Version property, which is not visible in Word unless the template has a custom property namedVersion. This can be added in Word under Info > Properties > Advanced Properties > Custom. Requires pso-docx version0.8.21or higher.
<revision select="1" />
<revision>maps to the Revision property in Word, which is not visible in Word.
<toc> (Table of Contents)
<toc generate="true">
  <!-- range from 1 up to 9 -->
  <outline generate="true" select="1-9" />

  <paragraph generate="false">
    <style value="[word style]" indent="[indent level]" />

    <!-- any paragraph style defined in the document
         with the corresponding TOC indent level
    -->
  </paragraph>
</toc>
The word-export-config.xml transforms the PSML element <toc> into the Table of Contents (TOC) field code in DOCX. It only uses the TOC paragraph styles, from the word-export-template.xml,not the entire preconfigured TOC. If you want a "Contents" heading, you need to add this in the PSML front matter. The TOC field code prompts Word to generate a TOC using any of the following object types, strictly in this order:
<outline>– generate the TOC from any styles in Word that have an outline level. For example, use the built-in heading styles in Word by setting the@generateattribute of<outline>totrue. The value of the@selectattribute can be an integer from 1 to 9.
<outline generate="true" select="3-6" />
<paragraph>– use specific paragraph styles by setting the@generateattribute of<paragraph>totrue. The<paragraph>element contains<style>elements, each with a unique@valueattribute that declares which paragraph styles generate the TOC. An@indentattribute sets the level for the paragraph style in the TOC hierarchy.
<paragraph generate="false">
  <style value="Heading 1" indent="1" />
  <style value="Heading 2" indent="2" />
  <!-- any paragraph style defined in the document
       with the corresponding TOC indent level
   -->
</paragraph>
- Default behavior – by default, all heading levels are added to the TOC using outline level and the value of the
@generateattribute on the<paragraph>element is set tofalse.
As of pso-docx version 0.8.28 or higher, in the word-export-config.xml, element <toc> can appear in the following two elements:
- Under
<config>– relates to the generation of a root (top-level) Table of Contents. - Under
<elements>– it generates a non-root (branch-level) Table of Contents, for example, at the Chapter level.
The use of the <headings> element under <toc> is deprecated – use <outline> instead.
<default>
This element sets the default conversion options.
<default>
  <defaultparagraphstyle wordstyle="Body Text" />
  <defaultcharacterstyle wordstyle="Default Paragraph Font" />
  <comments generate="false" />
  <mathml generate="false" />
  <citations documenttype="bibliography" pageslabel="pages" />
  <endnotes documenttype="endnotes" />
  <footnotes documenttype="footnotes" />
  <xrefs hyperlinkstyle="PS Hyperlink"
         referencestyle="PS Reference" />
  <placeholders resolvedstyle="PS Placeholder"
                unresolvedstyle="PS Unresolved" />
  <indexdoc documentlabel="indexdoc" columns="2" />
  <master select="filename" />
</default>
All the following elements are optional:
<defaultparagraphstyle>– any<block>without a specific mapping to a DOCX style transforms to a default style name. Usually this isBody Text, but it can be any paragraph style name inword-export-template. Where the template doesn’t have a style that matches, the default style is set toNormal.This element has no effect ifblock/@defaultdescribed below is set.
<defaultparagraphstyle style="Body Text"/>
<defaultcharacterstyle>– declares a character style for all inline elements with no specific mapping. The default value isDefault Paragraph Font.<defaultcharacterstyle>can be any character style name in theword-export-template. Where the template doesn’t have a style that matches, the value is theDefault Paragraph Font. This element has no effect ifinline/@defaultdescribed below is set.
<defaultcharacterstyle style="Default Paragraph Font"/>
<comments>– this adds a comment to each fragment via an email link to PageSeeder from any standard email application. This allows for document review offline. By default, this value is set tofalse.
<comments generate="false"/>
<mathml>– converts any Math ML object back to Open Office math ml objects for Word. By default, this value is set tofalse.
<mathml generate="false"/>
<citations>– xrefs to properties fragments in a document with type@documenttypevaluebibliographybecome DOCX sources, and in the output, a DOCX bibliography is inserted following the output PSML<section id="title">content from the bibliography document. An inline label attribute value of"pageslabel"directly after the xref, its content becomes the citation page or page range:
<xref documenttype="bibliography" ... >
             ...</xref>
<inline label="pages">10 - 20</inline>
Requires additional post-processing and pso-docx version 0.7.4 or higher.
<citations documenttype="bibliography" pageslabel="pages" />
<endnotes>– xrefs to fragments under<section id="content">in a document with type@documenttype"endnotes"become DOCX endnotes. The xrefs must have@type="alternate"and the document must be generated usingps:processANT task wherexrefs/@typesincludesalternate. Requires pso-docx version0.8.1or higher.
<endnotes documenttype="endnotes"/>
<footnotes>– xrefs to fragments under<section id="content">in a document with type@documenttype="footnotes"become DOCXfootnotes. The xrefs must have@type="alternate"and the document must be generated usingps:processANT task wherexrefs/@typesincludesalternate. Requires pso-docx version0.8.1or higher.
<footnotes documenttype="footnotes"/>
<xrefs>– iftype="cross-reference"then PSML xrefs become DOCXREF, instead ofHYPERLINK.HYPERLINKoption,REFhas an ‘Update field’ option that prompts Word to refresh pointers to numbered paragraphs or headings.
As of version0.7.0, xrefs with@display="template"and@titlecontaining{parentnumber}or{prefix}become DOCXREFeven without setting@typeabove. Also<xrefs>supports the following attributes:@hyperlinkstyle– The style in Word for xrefs pointing outside the document (defaultPS Hyperlink).@referencestyle– The style in Word for xrefs pointing within the document (defaultPS Reference).
<xrefs type="cross-reference"
       hyperlinkstyle="My Hyperlink"
       referencestyle="My Reference" />
For further configuration information for xrefs in DOCX, see <xref>.
<placeholders>– maps styles for PSML<placeholder>elements with the following attributes: Requires pso-docx version0.8.8or higher.
@resolvedstyle– The style in Word for resolved placeholders. The default is the style of the containing element.@unresolvedstyle– The style in Word for unresolved placeholders - no corresponding metadata property. The default is the style of the containing element.
<placeholders resolvedstyle="My Placeholder"
              unresolvedstyle="My Unresolved" />
<indexdoc>– To include an index in a publication, first create adefaultPSML document, with alabel. This empty document serves as proxy for the index terms that are generated by the publish process, and that appear in the output Word document. Next, add the document to the publication root document. The<indexdoc>element has the following attributes.@documentlabel– The label that identifies the index PSML document.@columns– The number of columns in the generated index in Word - from 1 to 4 (default2).
For how to insert index entries in your content, see the <index> element within element <inline>. Requires pso-docx version 0.8.20 or higher.
<indexdoc documentlabel="myindex" columns="1" />
<master>– generates a master document by converting any<blockxref mediatype="application/vnd.openxmlformats-officedocument.wordprocessingml.document">to a subdocument. The<master>element must have the attribute@selectwith one of the following values:filename– subdocuments reference the filename in theblockxref/@href(e.g.my_doc.docx)uriid– subdocuments reference theblockxref/@uriid+.docx(e.g.123.docx)urititle– subdocuments reference theblockxref/@urititle+.docx(e.g.My document.docx)
The Word section for a subdocument is determined by blockxref/@urilabels and the configuration element <document>, except that once expanded the last subdocument uses the section from its DOCX file. Requires pso-docx version 1.4.0 or higher.
<master select="urititle" />
In the word-export-template.docx, only character styles can format hyperlinks, references, or placeholders.
<elements>
The config object <elements> is used to transform PSML to Word styles:
- For a particular PSML document in a publication, or
- Where the config object
<elements>has no@labelattribute, the transformation applies to the rest of publication.
The allowable attribute values on config object <elements> are:
@label– A component PSML document – processing the elements in a PSML document, and either:@blocklabel– Overrides the Word style mappings for documents with a label. Use to differently transform the elements under a specific block label. Requires pso-docx version0.8.20or higher, OR-
@fragmentlabel– Overrides the Word style mappings for supported PSML objects (<heading>,<para>,<list>,<nlist>) inside fragments with a label that are inside documents with a label. Use to differently transform the elements under a fragment that has this label
Transforms of PSML content can be different according to the value of the @label attribute on a PSML document. A PSML document label, along with config object <documents>, can be used to map PSML elements to a specific section in a Word template.
The config objects that are allowed inside <elements> are explained in the following sections:
<document><block><image><inline><properties-fragment><table><heading><para><title><nlist><list><preformat><xref>
@label
<elements label="schedule">
Where a @label attribute is specified, options under this config object <elements> only apply to the content of PSML documents with the specified label. In the following example, the options under <elements> apply only to a document with label ‘schedule’.
<elements label="schedule">
  <heading>
    <level value="2" wordstyle="sched-head-a"/>
    <level value="3" wordstyle="sched-head-b"/>
  </heading>
  <para>
    <indent value="2" wordstyle="sched-clause-a"/>
  </para>
  <list liststyle="Bulleted List>
    <role value="rules" liststyle="sched-bullet">
  </list>
</elements>
Document types are ignored by the word-export-config.xml – document labels are used in the export processing. As part of the default Word export process, a references document label is added to documents of type references, and if using the Custom DOCX sample code, a references label is also added automatically to the publication root document.
An <elements label="references"> element declaration is not generally required in the word-export-config.xml, except when using the default Word export. When your root document is another document type (not references), this element is required, with its corresponding label attribute.
@blocklabel
Where <elements> have a @blocklabel, the options underneath only apply to PSML elements with that block label as their closest ancestor. Requires pso-docx version 0.8.20 or higher.
<elements blocklabel="info">
Example 1
The following example defines the content in <block> elements with @label block2.
<elements blocklabel="block2">
    <heading>
      <level value="2" wordstyle="Heading Unnum 3"/>
    </heading>
    <para>
      <indent level="0" wordstyle="List Continue 2"/>
    </para>
    <list liststyle="Numbered List" />
    <nlist liststyle="Bulleted List" />
  </elements>
Example 2
The following example defines the content in <block> elements with @label block2 that are within a document with label appendix.
<elements label="appendix" blocklabel="block2">
    <heading>
      <level value="2" wordstyle="heading 3"/>
    </heading>
    <para>
      <indent level="0" wordstyle="List Continue 4"/>
    </para>
    <list liststyle="Bulleted List" />
    <nlist liststyle="Numbered List" />
  </elements>
@fragmentlabel
Where <elements> have a @fragmentlabel, the options underneath only apply to PSML elements when their closest ancestor <fragment> has @labels containing this label. Requires pso-docx version 0.8.27 or higher.
<elements fragmentlabel="details">
Example 1
The following example defines the content in a <fragment> element with label block2.
<elements fragmentlabel="block2">
    <heading>
      <level value="2" wordstyle="Heading Unnum 3"/>
    </heading>
    <para>
      <indent level="0" wordstyle="List Continue 2"/>
    </para>
    <list liststyle="Numbered List" />
    <nlist liststyle="Bulleted List" />
  </elements>
  <elements label="appendix">
    <heading>
      <level value="1" wordstyle="heading 1"/>
      <level value="2" wordstyle="heading 2"/>
    </heading>
    <para>
      <indent level="0" wordstyle="List Continue 3"/>
    </para>
    <list liststyle="Numbered List" />
    <nlist liststyle="Bulleted List" />
  </elements>
Example 2
The following example defines the content in <fragment> element with label fragment2 that are within a document with label appendix.
<elements fragmentlabel="fragment2" label="appendix">
    <heading>
      <level value="2" wordstyle="heading 3"/>
    </heading>
    <para>
      <indent level="0" wordstyle="List Continue 4"/>
    </para>
    <list liststyle="Bulleted List" />
    <nlist liststyle="Numbered List" />
  </elements>
<elements>with@blocklabelor@fragmentlabelonly support<heading>,<para>,<list>and<nlist>options.- There is no support for both
@blocklabeland@fragmentlabelon the same<elements>. elements/@blocklabeloptions overrideelements/@fragmentlabeloptions.
<document>
<config>
  <elements label="references">
    <document wordsection="1" />
  </elements>
  <elements label="front">
    <document wordsection="2" />
  </elements>
  <elements label="landscape">
    <document wordsection="4" />
  </elements>
  <elements>
    <document wordsection="3" />
  </elements>
</config>
This element is useful for mapping content of a PSML document to the page layout in a particular section in a Word document. Word documents can have multiple sections, often used to change the layout, headers, or footers in different parts of a document. For example, a cover page might have a different layout or background to the rest of the document, or tables or images might require landscape page orientation. Putting a background on a cover page is done by inserting an image into the header for that Word section and setting “Behind text” in its layout options. Requires pso-docx version 0.8.23 or higher.
The only way to change sections in the DOCX document is by applying a document label on a PSML document. It outputs the content from that document into the corresponding DOCX section.
For example, to invoke a landscape page requires a PSML document and label, and a corresponding declaration in the word-export-config.xml.
The same applies to change margins or header and footer. For example, a cover page without: header, footer, and having large page margins, needs to be in a separate PSML document with a document label. Then, any front matter and the table of contents pages might have Lower Roman page numbering in the footer, so that content needs to be in a PSML document with a label. Then, the remaining content might have header and footer content and have custom page layout. If documents have no label specified in <elements>, then the first section of the word-export-template.docx is used.
Including these documents in the publication can be done in a number of ways, including by:
- Adding a document to the publication.
- Including the document by xref.
- By transcluding the landscape document.
In the above example, the following sections are used:
- PSML documents with the document label
referencesuse the first section. - PSML documents with the document label
frontuse the second section. - PSML documents with the document label
landscapeuse the fourth section. - The third section in the template is the default layout for all PSML documents.
If no section number is defined in the word-export-config.xml, the layout in the first section in the word-export-template.docx is used by default.
The order of the sections in the word-export-template.docx template is significant.
When there is a requirement for page numbers to restart for a section, then the sections order in the template must be the same as the order they first appear in the exported document. Page numbers will not restart when going from a later to an earlier section in the template.
In the previous example, if section 3 in the .docx template was set to restart, then in the exported document, page numbers would restart when section 3 followed section 2, but not when it followed section 4. This is because there might be multiple landscape pages after which you don’t want the numbering to restart, but you do want them to restart after the front matter.
Also in the .docx template all headers and footers should have Link to Previous turned off in case not all sections are used in the exported document.
Table of Contents – TOC
The <toc> element is part of either the first section (document with label references), or the second section (document with label front). The front document is useful for separating the numbering of the front pages from the rest of the publication, for example, using roman numerals page numbers in the front matter.
If no document label is defined in the word-export-config.xml, the content is output using the layout in the default section of the template.

To use a different section for transcluded content, such as landscape images, the whole PSML document containing the image must be transcluded, not just a single fragment. This makes the document label, for example landscape, available to the DOCX export.
Element <document> uses the value of a @wordsection attribute to map the content in a standalone PSML document, or a component document in a publication, to use the layout in a particular section in the word-export-template.docx, where the value matches as 1=first section in the template, 2=second section and so on. If the .docx template is not already displaying the section number at the bottom left in the status bar, right-click in the bar and click "Section".
If you are using sections in your word-export-template.docx, then under each <elements>, specify a value for the @wordsection attribute in a <document> element.
If a section is not specified, the section for the default <elements> is used. If there is no default specified, the export process uses the layout in Section 1 in word-export-template.docx.
![]()
To insert a section in a Word document, select Layout > Breaks.
<block>
<block  default="generate-ps-style">
  <label value="Abstract"   wordstyle="Instructions" />
  <label value="Prompt"     wordstyle="Prompt" />
  <label value="Tip"        wordstyle="generate-ps-style" >
    <keep-paragraph-with-next />
  </label>
  <ignore label="Notes" />
</block>
<block> handles all <block> elements that map to a paragraph style in Word, with the @default attribute defining how to handle all <block> elements that have no mapping to a paragraph style (or are incorrectly mapped to a non-paragraph style). It accepts three values:
generate-ps-style– this naming convention generates a style in Word, for each label:
ps_blk_[name-of-label]
none– (the default) maps block element content to the default paragraph style, unless declared with the following elements.A paragraph style name present in the word-export-template.docx– maps block element content to this specified paragraph style, unless declared with the following elements.
Under <block>, two elements are valid and must be in this order:
<label>– transforms the content of this block into the style in Word, of the attribute@wordstyle. The attribute@wordstyleunder<label>can also containgenerate-ps-style, forcing the process to generate a unique style for that block label. The<keep-paragraph-with-next/>element can be used to keep this content on the same line as the next content, known in Word as a 'Style separator'.<ignore>– means the content inside this block won’t be transformed on export.
Example
In the following example, blocks with labels other than the defined TestPara1 are transformed as the style List Bullet.
<elements>
  <block default="List Bullet">
    <label value="TestPara1" wordstyle="ListNumber"/>
  </block>
</elements>
Using <ignore> or <label>, even under <elements> with @label, disables the generate-ps-style option for that particular block label on all documents. For example, the following config will never use the generated ps_blk_Info Word style for the Info block label, even if it is in documents that don’t have the appendix label:
<elements>
  <block default="generate-ps-style" />
<elements>
<elements label="appendix">
  <block>
    <label value="Info"
           wordstyle="Highlight"/>
  </block>
</elements>
<image>
Defines a style in Word for <image> elements. In PageSeeder, an image is an inline object, so the value of the @wordstyle attribute must map to a character style, not a paragraph style. This is useful, for example, for icon images that are inline in the content. Requires pso-docx version 0.8.19 or higher.
The <image> can have a @maxwidth attribute with the value in pixels, useful for scaling down larger images (default 620).
A @widelabel defines an image label that ignores @maxwidth to accommodate large images such as a landscape drawing. Requires pso-docx version 0.8.20 or higher.
<image wordstyle="Image" maxwidth="400" widelabel="big" />
Formatting images
In the PSML, when an image is:
- Inline in the content – outputs to a Word character style (the default character style is Image).
- In a
<block>element – when an image is inside a<block>element (the<image>element is inside the<block>), the image is then mapped to a Word paragraph style, so that the image can be formatted.
<block  default="generate-ps-style">
  <label value="img-centred" wordstyle="Image Centered" />
</block>
<inline>
<inline default="generate-ps-style" >
  <label value="Optional" wordstyle="OptionalNormal" />
  <ignore label="Notes" />
  <tab label="TabLabel" />
  <fieldcode label="n" value="LISTNUM  LegalDefault \\l 1 \\s 2 " />
  <index label="ind" />
</inline>
<inline> element handles all <inline> elements, that map to a character style in Word, with the @default attribute defining how to handle all <inline> elements that have no mapping to a character style (or are incorrectly mapped to a non-character style). There are three options:
generate-ps-style– this naming convention generates a style for a label in Word:
ps_inl_[name-of-label]
none– (the default) maps inline element content to the default character style, unless declared with the following elements.A character style present in the word-export-template.docx– maps inline element content to this specified character style, unless declared with the following elements.
Five elements are valid under <inline>, but they must be in the following order:
<label> – defining a label name using the attribute @value under <label> transforms the content of the inline label into the character style in Word, of the attribute @wordstyle. The attribute @wordstyle under <label> can also contain generate-ps-style to force the generation of a style for each inline label.
<ignore> – means the content inside this inline label won’t be transformed on export.
<tab> – defines a style through the value of the attribute @label under <tab>. The contents inside this inline, for example, a space, are transformed to a tab on output in Word.
<fieldcode> – where the inline label matches the value of the @label attribute under <fieldcode>, the contents transform into a fieldcode on output in Word. The name in the @value attribute determines the generation of the fieldcode.
<index> – where the inline label value matches the value of the @label attribute under <index>, the contents transform into an index entry in Word. A colon character ":" in the content of the <inline> element indicates an index sub-entry. For example, the following inline objects in PSML would create two index entries. A first-level entry of "car", a second-level entry under car of “speed” and a third-level entry under speed of "fast".
Lorem ipsum<inline label="ind">car</inline> , lorem more<inline label="ind">car:speed</inline> and lorem extra<inline label="ind">car:speed:fast</inline>.
To prevent the index entry breaking to the next page in the Word output, in the PSML content, there should be no character space after the term and the open angle bracket "<" for the inline element. Requires pso-docx version 0.8.20 or higher.
Example for <index>
<config>
  <default>
    <indexdoc documentlabel="indexdoc" columns="1" />
  </default>
  <elements>
    <inline>
      <index label="ind" />
    </inline>
  </elements>
Using <ignore>, <label>, or <tab> even under <elements> with @label, disables only the generate-ps-style option for that particular inline label on all documents. Other output options can be used, including the same output as declared for the PSML document label.
Example
In the following example, inline content with label Test3 are transformed to character style annotation reference in Word. Other non-defined inline labels are transformed to character style Title Char in Word. Any content inside inline label Test2 is transformed to a tab in Word.
<elements>
    <inline default="Title Char">
        <label wordstyle="annotation reference" value="Test3"/>
        <tab label="Test2"/>
    </inline>
    </elements>
<preformat>
Contains style for <preformat> elements.
<preformat wordstyle="HTML Preformatted"/>
<properties-fragments>
<properties-fragments>
  <properties-fragment tablestyle="Table Grid"
                       titlestyle="PS Table Header"
                       valuestyle="PS Table Body" >
    <width type="pct" value="100%"/>
  </properties-fragment>

  <properties-fragment type="detail"
                       tablestyle="My Table"
                       titlestyle="My Table Header"
                       valuestyle="My Table Body"/>

  <properties-fragment type="foodcomponents"
                       tablestyle="Table Grid 2" >
    <width type="dxa" value="5000"/>
  </properties-fragment>
  <ignore label="extra" />
  <ignore label="test" />
</properties-fragments>
<properties-fragments> specifies how to format PSML properties as tables. Requires pso-docx version 0.8.21 or higher.
In the above example:
@tablestyle– sets the default table style to output in Word asTable Grid. Note, there are no hypens in the@tablestylevalue e.g. useGrid Table 5 Dark Accent 6notGrid Table 5 Dark - Accent 6.- (
@titlestyle) – sets the paragraph style for property titles asPS Table Header. - (
@valuestyle) – sets the paragraph style for property values asPS Table Body. @typeattribute – overrides the default table style for different PSML fragment types – use to map to a different table style to output in Word.<width>element – under each<properties-fragment>has a@typeattribute to express the size in either:dxa(a unit of measure).pct(percent, requires%after the value).- or
auto.
In Word, 100% is 5000 dxa (1 dxa = 1 twentieth-of-a point, 20 dxa = 1 point).
<ignore>element – use to ignore properties fragments with that fragment label. As in the example above, put it after<property-fragment>. To ignore all properties fragments, don’t specify a@labelattribute. Requires pso-docx version1.1.0or higher.
Use this export configuration when you want to export the PSML content of a properties fragment to a specific table design in Word. If not specified, then the default table design is used. (If your properties table in PSML has headers down the left column, then you can only output the contents to a different table design in Word that also has headers in the left column. You can only change the design/style of the table, not swap rows for columns.)
<tables>
<tables>
  <table default="PS Table"
         headstyle="PS Table Header"
         bodystyle="PS Table Body" >
    <width type="pct" value="100%"/>
  </table>
  <table role="mytable"
         tablestyle="Table Grid"
         headstyle="My Table Header"
         bodystyle="My Table Body"/>
  <table role="mytable2"
         tablestyle="Table Grid 2"
         layout="fixed">
    <width type="dxa" value="5000"/>
  </table>

  <col role="mycol1">
    <shading fill="00FF00" />
  </col>
  <col role="mycol2">
    <borders>
      <top type="single" color="000000" size="48" />
      <bottom type="double" color="FF0000" size="32" />
      <start type="dashed" color="00FF00" size="16" />
      <end type="wave" color="0000FF" size="2" />
    </borders>
  </col>

  <row align="start" />
  <row role="myrow1" align="center" cantsplit="true">
    <shading fill="FF0000" />
    <borders>
      <top type="single" color="000000" size="60" />
    </borders>
    <height type="atleast" value="1000"/>
  </row>

  <hcell role="myheader1" valign="top" />
  <hcell role="myheader2" valign="bottom">
    <shading fill="0000FF" />
    <borders>
      <top type="double" color="000000" size="48" />
    </borders>
    <width type="pct" value="20%"/>
  </hcell>

  <hcell role="mycell1" valign="top" />
  <hcell role="mycell2" valign="bottom">
    <shading fill="1152CC" />
    <borders>
      <bottom type="single" color="123456" size="32" />
    </borders>
    <width type="dbx" value="500"/>
  </hcell>

</tables>
<tables> element defines table styles in Word for each PageSeeder table. It can contain multiple entries of the following elements, but they must be in this order: <table>, <col>, <row>, <hcell> and <cell>.
Processing <col>, <row>, <hcell>, or <cell> requires pso-docx version 0.8.21 or higher.
<table>
Defines table properties through the following attributes and the element <width>.
@default– the default table style in the Word output, for example"PS Table"(this value can only be used once and not with@roleor@tablestyle).@role– the PSML table role these properties apply to, for example,mytable.@tablestyle– the table style in Word for this role, for example,Table Grid.@headstyle– the paragraph style for header cells, for example,PS Table Header.@headliststyle– the bulleted list style for header cells, for example,Table Bulleted List.@headnliststyle– the numbered list style for header cells, for example,Table Numbered List.@bodystyle– the paragraph style for normal cells, for example,PS Table Body.@bodyliststyle– the bulleted list style for normal cells, for example,Table Bulleted List.@bodynliststyle– the numbered list style for normal cells, for example,Table Numbered List.@layout– allowed values are:fixedif the column widths are fixed.autofitif they adjust to the content (defaultautofit).
Requires pso-docx version 0.8.21 or higher.
In the config, remove any hyphens (and the space before them) in Word table styles (e.g. Grid Table 5 Dark - Accent 6 becomes Grid Table 5 Dark Accent 6).
The table paragraph and list styles can be overridden by wrapping content in a block label.
The *liststyle attributes require pso-docx version 1.3.0 or higher.
Word table style options can be selected by modifying the source PSML as follows:
- Header Row – add
@part="header"to first<row>in PSML<table>. - Total Row – add
@part="footer"to last<row>in PSML<table>. - First Column – add
@part="header"to first<col>in PSML<table>. - Last Column – add
@part="footer"to last<col>in PSML<table>.
<col>
This element defines column properties and can contain the following @role attribute and the elements <shading> or <borders>.
@role– The PSML column role these properties apply to, for example,mycol1. If there is no@role, then they are the default properties.
<row>
This element defines row properties and can contain the following attributes and the elements <height>, <shading>, or <borders>. It overrides the column properties.
@role– The PSML row role these properties apply to, for example,myrow1. If there is no@role, then they are the default properties.@cantsplit– Iftrue, the row can't be split across a page break (defaultfalse).@align– Horizontal alignment with allowed values:center,start, orend.
<hcell>
This element defines header cell properties and can contain the following attributes and the elements <width>, <shading>, or <borders>. It overrides the column and row properties.
@role– The PSML header cell role these properties apply to, for example,myheader1. If there is no@role, then they are the default properties.@valign– Vertical alignment with allowed valuescenter,top, orbottom.
<cell>
This element defines cell properties and can contain the following attributes and the elements <width>, <shading>, or <borders>. It overrides the column and row properties.
@role– The PSML cell role these properties apply to, for example,mycell1. If there is no@role, then they are the default properties.@valign– Vertical alignment with allowed valuescenter,top, orbottom.
<width>
This element can be used under <table>, <hcell>, or <cell> and can have the following attributes:
@type– Allowed values are:dxa(a unit of measure).pct(percent, requires%after the value).- or,
auto.
In Word 1 dxa = 1 twentieth-of-a point, 20 dxa = 1 point, 567 dxa = 1 cm, 1140 dxa = 1 inch, 15 dxa = 1 pixel.
@value– The width in the unit specified, for example,5000or100%.
<height>
This element can be used under <row> and can have the following attributes:
@type– Allowed values are:atleast(height must be at least this value).- or,
fixed(height is fixed). @value– The height, in twentieths of a point (dxa).
<shading>
This element can be used under <col>, <row>, <hcell>, or <cell> and can have the following attribute:
@fill– The background fill color as 6 hexadecimal digits orauto, for example,aabb99.
<borders>
This element can be used under <col>, <row>, <hcell>, or <cell> and can contain these elements:
<top>, <bottom>. <start>, or <end>.
Each of these elements can have the following attributes:
@type– Allowed values are:single,dashDotStroked,dashed,dashSmallGap,dotDash,dotDotDash,dotted,double,doubleWave,inset,none,outset,thick,thickThinLargeGap,thickThinMediumGap,thickThinSmallGap,thinThickLargeGap,thinThickMediumGap,thinThickSmallGap,thinThickThinLargeGap,thinThickThinMediumGap,thinThickThinSmallGap,threeDEmboss,threeDEngrave,triple, orwave(required).@color– The border color as 6 hexadecimal digits orauto, for example,aabb99.@size– The border width in eighths of a point (minimum2, maximum96).
<heading>
<heading>
  <level value="1" numbered="true" wordstyle="heading 1" >
    <numbered select="true">
      <fieldcode regexp="%arabic%" type="SEQ" />
    </numbered>
  </level>
  <level value="2" wordstyle="heading 2" >
    <prefix select="true" separator="space">
      <fieldcode regexp="\d+\.%arabic%" type="SEQ" />
    </prefix>
  </level>
  <level value="3" wordstyle="heading 3" >
  </level>
  <level value="4" numbered="true" prefixed="true" wordstyle="heading 4">
    <prefix select="false" />
  </level>
  <level value="5" wordstyle="heading 5" >
    <numbered select="true" >
      <fieldcode
         regexp="^heading-1^.^heading-2^.^heading-3^.^heading-4^.%arabic%"
         type="SEQ" />
    </numbered>
    <keep-paragraph-with-next />
  </level>
  <level value="6" wordstyle="heading 6" >
    <numbered select="true" >
      <fieldcode
         regexp=
   "^heading-1^.^heading-2^.^heading-3^.^heading-4^.^heading-5^.%arabic%"
         type="SEQ" />
    </numbered>
    <keep-paragraph-with-next />
  </level>
</heading>
Mapping the PSML heading to the style in Word uses the config <heading>, and <level> with the following options that define how the content will be passed to docx, in this order:
<prefix><numbered><keep-paragraph-with-next>.
By default, every heading level maps to the equivalent heading style (heading level 1 to heading 1 style, heading level 2 to heading 2 style...). Alternatively, each PSML heading level can be transformed into an arbitrary DOCX style.
In <level>, the @numbered and @prefixed attributes match the @numbered and @prefix attributes in the corresponding PSML <heading>, and can be used to map to heading styles in Word. Then, the <prefix> and <numbered> options can be used to transform the numbering. They can also be used to map the PSML <heading> to non-heading styles in the Word template, that is, headings that are not Word’s default heading styles, such as unnumbered heading styles (as of pso-docx version 0.7.2).
In <level>:
- Both
@numbered="true"and@prefixed="true"– Matches a processed numbered heading (with the prefix having been generated in PageSeeder (by thepublication-config.xml)). In this case, include<prefix select="false" />so the prefix is not output to Word causing double numbering. If there is no<prefix>element, it will use the matching<prefix>under the default<elements>. @prefixed="true"– By itself – matches when the prefix was manually added in the PSML.@numbered="true"– By itself – only matches when the prefix number can’t be resolved.
If the heading is numbered, or has a prefix, it can be transformed into a fieldcode in the output. This is defined by a <fieldcode> element under the corresponding level/numbered or level/prefix.
The level/@prefixed attribute is ignored in this case.
As of pso-docx version 0.6.2, the <prefix> element supports a @separator="[tab|space|none]" attribute. This defines the character between the prefix and the heading text (tab is the default) unless @select="false" in which case neither the prefix, or the separator, are output.
The <keep-paragraph-with-next/> element can be used to keep this on the same line as the next content, known in Word as a 'Style separator'.
The level/@prefixed attribute is ignored in this case.
Styles “heading [x]” in Word must be in lower case, but all other styles in Word must match the case in the .docx template (for example, “Heading Numbered 1”).
<para>
<para>
  <indent level="0" wordstyle="Body Text" >
    <prefix select="true" separator="space" >
      <fieldcode regexp="Note %arabic%" type="SEQ" />
    </prefix>
  </indent>

  <indent level="1" wordstyle="List Continue" >
    <numbered select="true">
      <fieldcode
         regexp=
"^heading-1^.^heading-2^.^heading-3^.^heading-4^.^heading-5^.^heading-6^.%arabic%"
         type="SEQ" />
    </numbered>
  </indent>

  <indent level="2" wordstyle="List Continue" >
  </indent>

  <indent level="3" wordstyle="List Continue" >
  </indent>

  <indent level="4" wordstyle="List Continue" >
    <keep-paragraph-with-next />
  </indent>

  <indent level="5" wordstyle="List Continue" >
    <numbered select="true" >
      <fieldcode
         regexp=
"^heading-1^.^heading-2^.^heading-3^.^heading-4^.^heading-5^.^heading-6^.^para-^.%arabic%"
         type="SEQ" />
    </numbered>
  </indent>

  <indent level="6" wordstyle="List Continue" >
    <numbered select="true" >
      <fieldcode
         regexp=
"^heading-1^.^heading-2^.^heading-3^.^heading-4^.^heading-5^.^heading-6^.^para-1^.^para-5^.%arabic%"
         type="SEQ" />
    </numbered>
    <keep-paragraph-with-next />
  </indent>

  <!-- Prefixed paragraphs -->
  <indent level="1" prefixed="true" wordstyle="List Manual" />

  <indent level="2" prefixed="true" wordstyle="List Manual 2" />

  <!-- Numbered paragraphs -->
  <indent level="1" numbered="true" wordstyle="List Number" />

  <indent level="2" numbered="true" wordstyle="List Number 2" />


  <!-- Numbered prefixed paragraphs -->
  <indent level="1" numbered="true" prefixed="true" wordstyle="Para Indent">
    <prefix select="false" />
  </indent>
  <indent level="2" numbered="true" prefixed="true" wordstyle="Para Indent 2">
    <prefix select="false" />
  </indent>

</para>
Mapping the PSML paragraph to the style in Word uses the config <para>, and <indent> with the following options that define how the content will be passed to docx, in this order:
<prefix><numbered><keep-paragraph-with-next>.
As of pso-docx version 0.6.1, the @numbered and @prefixed on <indent> can be used to apply different styles in Word to PSML <para> with @prefix or @numbered="true" as follows:
@prefixed="true" @numbered="true"– used together, matches a processed numbered paragraph (with the prefix generated by PageSeeder). In this case include<prefix select="false" />so the prefix is not output to Word causing double numbering. If there is no<prefix>element it will use the matching<prefix>under the default<elements>.@prefixed="true"– used by itself, matches when the prefix was manually added.@numbered="true"– used by itself, only matches when the prefix number can’t be resolved.
If the paragraph is numbered, or has a prefix, it can be transformed into a fieldcode in the output. This is defined by the <fieldcode> element under the corresponding indent/numbered or indent/prefix.
The indent/@prefixed attribute is ignored in this case.
As of pso-docx version 0.6.2 the <prefix> element can have a @separator="[tab|space|none]" to define the character between the prefix and the paragraph text (tab is the default) but if it has @select="false" the prefix and separator won’t be output.
The <keep-paragraph-with-next/> element can be used to keep this on the same line as the next content, known in Word as a 'Style separator'.
The indent/@prefixed attribute is ignored in this case.
<title>
<title wordstyle="heading 1"/>
Element <title> is used to define the paragraph style in Word for each PSML section title, if you want to output them.
By default, title is set to heading 1. It can be transformed into any value that exists in the word-export-template.docx.
<nlist>
Contains the declaration for transforming numbered lists in PSML to a numbered multi-level List Style in Word. The default export for a PSML <nlist> is to the default multi-level List Style, "Numbered List", in Word.
<nlist liststyle="Numbered List" />
  <role value="highlight" liststyle="Highlighted Numbered List" />
</nlist>
In the config, the @liststyle attribute on both <nlist> and <role> can be used to apply a different multi-level List Style in Word. The <default> and <level> elements are no longer supported under these elements. (As of pso-docx version 0.6.1.)
If the PSML <nlist> has a @role attribute, it can be associated with a List Style in Word using the config <role> element.
In the example above, config <nlist> and <role> together, transform a PSML <nlist> with a @role value "highlight" to the styles in Word in a non-default Word multi-level List Style named "Highlighted Numbered List", in the word-export-template.docx.
<list>
Contains the declaration for transforming unnumbered lists in PSML to an unnumbered multil-level List Style in Word. The default export for a PSML <list> is to the default multi-level List Style, "Bulleted List", in Word.
<list liststyle="Bulleted List" >
  <role value="highlight" liststyle="Highlighted Bulleted List" />
</list>
In the config, the @liststyle attribute on <list> and <role> can be used to apply a different multi-level List Style in Word. The <default> and <level> elements are no longer supported under these elements. (As of pso-docx version 0.6.1)
If the PSML <list> has a @role attribute, it can be associated with a List Style in Word using the <role> element.
In the example above, config <list> and <role> together, transform a PSML <list> with a @role value "highlight" to the styles in Word in a non-default Word multi-level List Style named "Highlighted Bulleted List", in the word-export-template.docx.
The PSML <list> or <nlist> as a whole is mapped to a List Style in Word. PSML list <item> elements cannot be individually mapped to different paragraph styles.
The @type on <list> and <nlist> in PSML is ignored, as it could clash with the default and role based styles in Word. To alert editors to this in PageSeeder, the following custom CSS could be added:
.psml-content
ul[data-type]:before,
ol[data-type]:before
    {

    color: white;

    content:"LIST TYPE IS NOT SUPPORTED BY WORD EXPORT";

    background: red;

    border-radius: 2px;

    padding: 1px 4px;

    }
.psml-content ul[data-type]
li, ol[data-type] li
{

    color: red

}
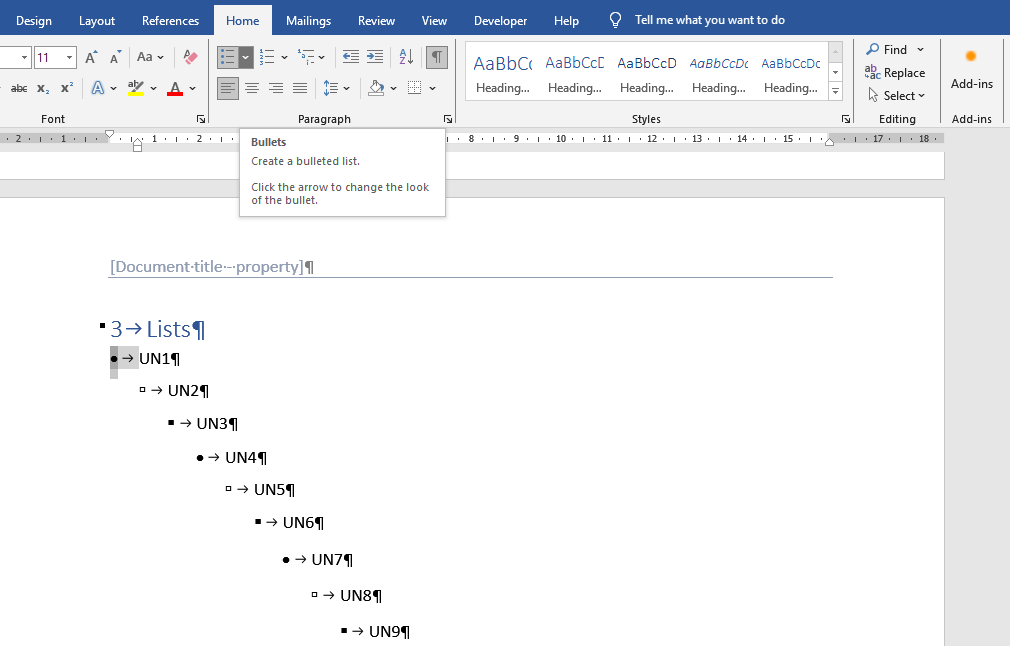
<listpara>
Declares the styles in Word, when there are multiple PSML <para> paragraphs inside an <item> in <list> or <nlist>. Note that <br/><br/> is equivalent to <para> in this case. The @value on the config <level> element represents the nesting level of the <list> or <nlist> the paragraph continues on from. Requires pso-docx version 0.7.5 or higher.
<listpara>
  <level value="1"  wordstyle="List Continue" />
  <level value="2"  wordstyle="List Continue 2" />
  <level value="3"  wordstyle="List Continue 3" />
  <level value="4"  wordstyle="List Continue 4" />
  <level value="5"  wordstyle="List Continue 5" />
  <level value="6"  wordstyle="List Continue 6" />
</listpara>
Example PSML
<fragment id="2">
  <nlist>
    <item>
      <para>List level 1</para>
      <para>List continue: Lorem ipsum dolor sit amet.</para>
      <nlist>
        <item>List Level 2<br/><br/>
          List continue 2: Lorem ipsum dolor sit amet.
          <nlist>
            <item>
              <para>List Level 3<br/><br/>
                List continue 3: Lorem ipsum dolor sit amet.</para>
              <nlist>
                <item>List Level 4<br/><br/>
                  List continue 4: Lorem ipsum dolor sit amet.
                  <nlist>
                    <item>List level 5<br/><br/>
                      List continue 5: Lorem ipsum dolor sit amet.
                      <nlist>
                        <item>List Level 6<br/><br/>
                          List continue 6: Lorem ipsum dolor sit amet.
                        </item>
                      </nlist>
                    </item>
                  </nlist>
                </item>
              </nlist>
            </item>
          </nlist>
        </item>
      </nlist>
    </item>
  </nlist>
</fragment>
Example DOCX

<xref>
Declares the character styles in Word, for specific types of cross-references (the child elements are optional but must appear in the order below). Requires pso-docx version 0.7.4 or higher.
<xref>
  <footnote textstyle="My Footnote Text"
            referencestyle="My Footnote Reference" />

  <endnote textstyle="My Endnote Text"
           referencestyle="My Endnote Reference" />

  <citation referencestyle="My Citation Reference" />

  <xrefconfig name="field"
              hyperlinkstyle="My Field Link"
              referencestyle="My Field Reference" />

  <xrefconfig name="term"
              hyperlinkstyle="My Term Link" />
</xref>
In config <xref> element:
<footnote>element – declares the footnote text and reference styles in Word (the default@textstyleisFootnote Text, and the default@referencestyleisFootnote Reference).<endnote>element – declares the endnote text and reference styles in Word (the default@textstyleisEndnote Text, and the default@referencestyleisEndnote Reference).<citation>element – declares the citation reference style in Word, and the default@referencestyleis the default character style (see config<default>element above). The bibliography text style is alwaysBibliography.- Multiple
<xrefconfig>elements and the@nameattribute – refer to the@nameon the<xref-config>element in thexref-config.xml. They declare the styles in Word for the xref hyperlink and reference (the default@hyperlinkstyleand@referencestyleare defined in the config<default>element above). Requires pso-docx version0.7.6or higher.
In the word-export-template.docx, any hyperlink or reference styles must be character only styles.