New installation on el7
Once the prerequisites described in New installation have been performed the following instructions can be used for a new PageSeeder installation on el7 (enterprise linux v7, for example CentOS 7).
Installing PageSeeder
Running the PageSeeder installer requires Rocky, CentOS, Fedora or Amazon Linux.
For production systems we recommend using SSL encryption, so you should ensure you have a signed SSL certificate before beginning the installation.
- If not installed already, install Java 11 and for alternatives select
java-11-openjdk(or Java 1.8.0 for PageSeeder v5 — see which version of java) as follows: - OpenJDK (JDK 11) install
$ sudo yum install java-11-openjdk
$ sudo alternatives --config java
-
Install PageSeeder as follows:
$ sudo rpm -Uvh https://download.pageseeder.com/pub/rpm/pageseeder-repository-1.1-1.noarch.rpm
$ sudo yum install pageseeder
- Configure PageSeeder as shown below.
- For development use, press Enter to accept the default values, but for production we recommend enabling SSL encryption with
443for the SSL port and at least-Xmx1024for the Java options.
$ sudo service pageseeder config

Have you downloaded the MySQL Connector/J JDBC driver (y/n) [y]?

Please locate the MySQL JDBC driver jar file
/home/myuser/mysql-connector-java-5.1.32-bin.jar

Please enter the API port used by the Publish Engine to communicate with PageSeeder [8282]

Please enter the maximum number of concurrent HTTP connections [200]

Do you want to enable SSL on the PageSeeder server (y/n) [no]?

Please enter the website TCP/IP port used by the PageSeeder server [8080]

Please enter the Java options for the PageSeeder server [-Xmx1024m]

Please enter the port used by the SMTP mail server [2525]

Stopping xinetd:                                           [  OK  ]
Starting xinetd:                                           [  OK  ]
To complete setup of the PageSeeder Server, please start the pageseeder service
then go to http://myserver.com:8080/ps/ui/setup.html
- If you chose a website port less than 1024 (e.g. 80 or 443 for SSL), then configure a proxy from this port to the API port (e.g. 8282). To do this, see Configuring A Proxy.
- Start the PageSeeder server as follows:
$ sudo service pageseeder start
- Go to the URL for the server in a web browser (e.g. https://myserver.com ) and the Setup page should appear. Fill in the form to complete the setup.
You can reconfigure PageSeeder at any time by doing:
$ sudo service pageseeder stop
$ sudo service pageseeder config
$ sudo service pageseeder start
Rerunning the setup
If the the setup has been completed but there is a database error message in the file pageseeder/webapp/WEB-INF/state/logs/general/general.log even after restarting PageSeeder the Setup page can be used again as follows:
- Remove the
DBURLproperty inpageseeder/webapp/WEB-INF/config/database.properties - Restart the PageSeeder service.
- Go to the URL for the server in a web browser (e.g. https://myserver.com ) and the Setup page should appear. Fill in the form to complete the setup.
Doing this on a server with existing data on it may cause loss of content due to the database and the filesystem being inconsistent. If creating a new database then the existing pageseeder/webapp/WEB-INF/state and pageseeder/documents folders will need to be moved to another location or deleted after PageSeeder is stopped.
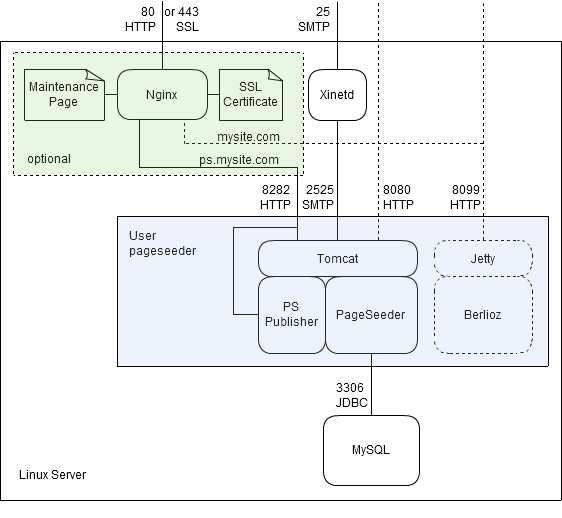
Installation architecture
Following is a diagram of the installation architecture on Linux. The PageSeeder components should run as the PageSeeder user for better security so can only use ports above 1024. Xinetd is used to transfer incoming email from port 25 to port 2525.
The dashed lines show optional components:
- To use default HTTP (port 80) or SSL (port 443), NGINX needs to be configured as a reverse proxy. NGINX has various advantages, like displaying a maintenance page if PageSeeder is down, and having PageSeeder and Berlioz under different domains on the same IP address.
- Otherwise, you can use ports above 1024 (e.g. 8080 and 8099) without NGINX.
- Jetty and Berlioz aren’t included in the PageSeeder installer—see Website Engine for more information.
Stopping and starting PageSeeder
Enter the following commands:
# service pageseeder stop
# service pageseeder start
Or to stop and then start:
# service pageseeder restart
Modifying PageSeeder memory usage
To modify the amount of memory (RAM) that PageSeeder is using PageSeeder must be stopped, configured and then started using the following commands. For configuration press Enter to accept the [default] value except for Java options enter the new number of megabytes of memory to use, for example -Xmx2048m.
# service pageseeder stop
# service pageseeder config
Please enter the API port used by the Publish Engine to communicate
with PageSeeder [8282]

Please enter the maximum number of concurrent HTTP connections [200]

Do you want to enable SSL on the PageSeeder server (y/n) [no]?

Please enter the website TCP/IP port used by the PageSeeder server [8080]

Please enter the Java options for the PageSeeder server [-Xmx1024m]
-Xmx2048m
Please enter the port used by the SMTP mail server [2525]

Stopping xinetd:                                           [  OK  ]
Starting xinetd:                                           [  OK  ]
To complete setup of the PageSeeder Server, please start the
pageseeder service
# service pageseeder start
Uninstalling PageSeeder
Enter the following commands:
# service pageseeder stop
# yum remove pageseeder
Some document and config folders might need to be removed manually.